
The POS dashboard is the main selling screen of your point of sale. From the Products screen you can search for products, add them to a sale, choose a customer and check out.
This quick guide is written for first time users. It labels each part of the product tiles and the sale panel with a number, and the list below explains what every number does.
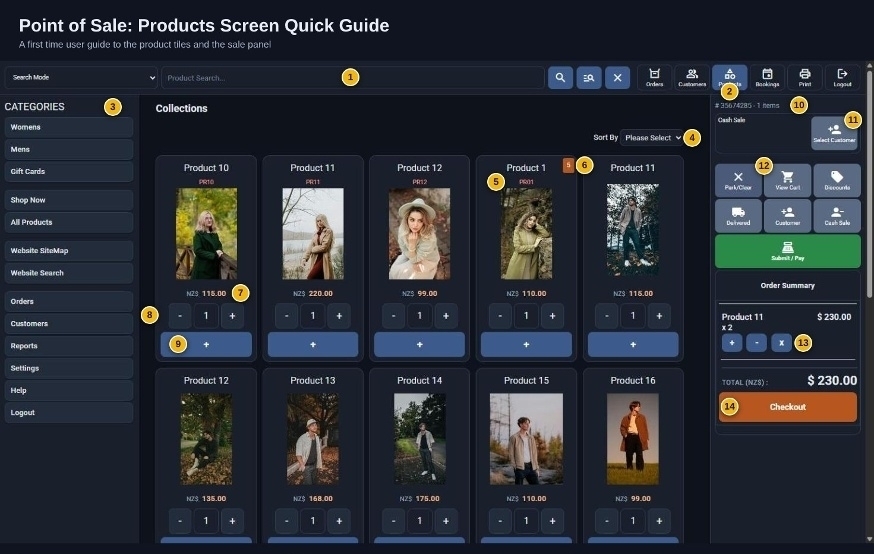
What each number means
- Search: Type a product name or code, then press the magnifier. The dropdown on the left changes how the search works.
- Top menu: Jump between Orders, Customers, Products, Bookings and Print. The highlighted button shows where you are.
- Categories: Click a category to filter the products. All Products shows everything.
- Sort By: Reorder the list by Alphabetical, Code, Lowest Price, Highest Price or Newest.
- Product code: The red text under the name is the product code (for example PR01). Use it to search fast or match stock sheets.
- Stock number: The small orange number at the top right of a product is how many are in stock. In the example, Product 1 has 5 on hand.
- Price: Shown in your selected currency for one item.
- Quantity: Use minus and plus, or type a number, to set how many you are selling.
- Add to sale: The wide blue plus button adds that quantity to the current order.
- Sale number: Shows the current order number and how many items are in it. The sale starts as a Cash Sale.
- Customer: Select Customer attaches the sale to a customer record. Leave it as Cash Sale for walk in buyers.
- Quick actions: Park/Clear, View Cart, Discounts, Delivered, Customer and Cash Sale sit here for common jobs.
- Edit a line: Under Order Summary, use plus or minus to change the quantity, or X to remove the item.
- Checkout: Check the total, then press Checkout to finish the sale. Submit / Pay above it is the green option for payment.
Summary
To make a sale on the POS dashboard, find your product using Search (1), Categories (3) or Sort By (4). Set the Quantity (8) and press the blue plus button, Add to sale (9). Check the Sale number (10) and choose a Customer (11) if the sale is not a Cash Sale. Use Quick actions (12) for jobs such as discounts or delivery, and Edit a line (13) to change a quantity or remove an item. When the total in the Order Summary looks right, press Checkout (14) to finish the sale.