
Connecting your website to Google Search Console helps Google find and index your pages. It also keeps Google up to date as you add, edit or remove content.
Search Console also reports on how your site appears in Google search results, which gives you useful insights for improving your website.
Before you start
Your website needs to be published and live on your domain before you can verify ownership. Google occasionally updates Search Console, so some screens and button names may look slightly different from the steps below.
Connect your site and submit your sitemap
Step 1: Sign in and add a property
Go to https://search.google.com/search-console and sign in with your Google account. If you don't have one yet, create an account first. Then select Add property.

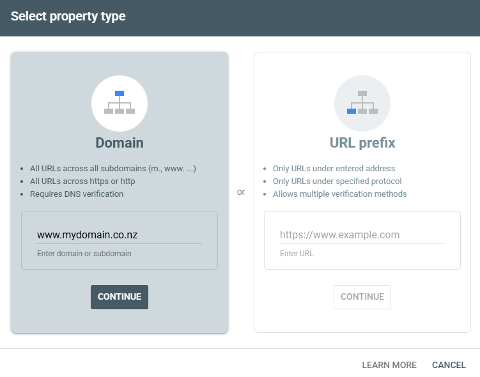
Step 2: Choose a property type
Choose how you want to connect your site:
- Domain covers your whole domain and is verified with a DNS record.
- URL prefix covers one specific address and can be verified with an HTML file upload, a meta tag, or other methods.
Step 3: Verify ownership
Follow the verification steps for the option you chose. See How to verify your domain for detailed instructions on each method.
Make sure your site is published so the verification file or code is live on your domain. You may need to come back in 15 minutes to select Verify in Search Console to confirm ownership.

Step 4: Submit your sitemap
Once your site is verified, select Sitemaps in the left sidebar. Enter sitemap.xml in the sitemap field and select Submit. Your full sitemap address will look like this:
https://www.yourdomain.co.nz/sitemap.xml
Google can take a little while to process your sitemap. Once it has, the Sitemaps page will show the status as Success. You may need to refresh the page.
Verifying Your Domain
For detailed steps on verifying your domain using the Domain option or URL Prefix option - see the link below: