Marking Orders as Shipped Manually
If you are using a courier integration, depending on your settings - your courier company will be feeding the tracking number back into the website.
Some courier integrations will have settings allowing you to send the notification from their dashboard, or to send from the CMS.
These settings below show how to mark orders as shipped manually.
To mark orders as shipped manually (individual orders)

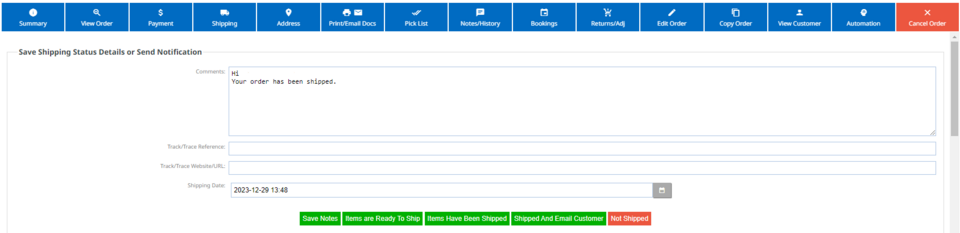
3. Here you can adjust your shipping message per order if needed. This default message can be adjusted by following the instructions here.
4. Enter your customers track/trace reference number.
5. Enter your courier companies tracking URL.
6. You can adjust the shipping date.
Save notes: Just saves the information you have inputted here.
Items are ready to ship: Changes the order status to Ready to Ship.
Items have been Shipped: Marks the order as shipped but does not notify the customer.
Shipped and Email Customer: Marks the order as shipped and emails the customer the shipping notification.
To Mark Orders as Shipped in Bulk (No customer notification)
1. Go to Orders on the left hand menu OR E-Commerce > Orders. There is also another option of viewing orders from your sign in dashboard.
2. Select the orders you wish to change by clicking the check mark next to it.
3. You will notice as you do this, more options will show on the right hand side. Use the "Shipped" button to mark all checked orders as shipped. This method does not send customer notifications.
Using this approach, you may need to refresh your screen to see the changes made.
